A small and powerful PC
By Sergey Nosov
April 1, 2013

One of our engineers stopped by my desk a few days ago and asked what I would recommend for a powerful computer for him to run AutoCAD on. He said it would be nice to have something small enough he could take on an airplane with him.
At the same time the engineer was eying a Shuttle xPC computer on my desk. He said, “How fast is something like this.” I said, “Oh, I can build you a really fast one.” Lo and behold, my latest (PC) build.
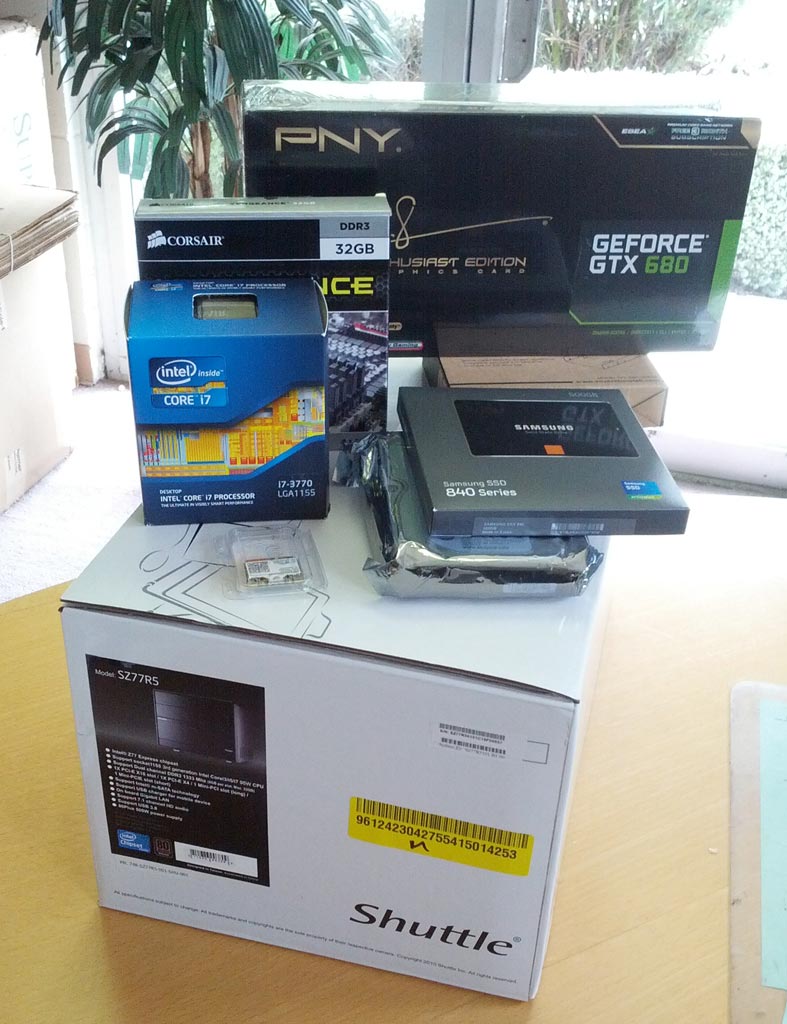
The selection of components was influenced by what Amazon had in stock and for how much. Here is what we ended up with:
| Shuttle SZ77R5 Barebone System | $349.99 |
| Intel Core i7-3770 Quad-Core 3.4 GHz 8 MB Cache | $279.99 |
| Corsair Vengeance 32GB (4x8GB) PC3 12800 Memory | $195.01 |
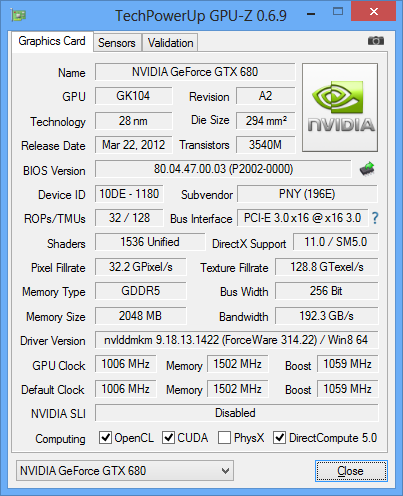
| PNY GeForce GTX 680 Graphics Card | $439.99 |
| Samsung 840 500GB Solid State Drive MZ-7TD500BW | $328.55 |
| Seagate Barracuda 2 TB HDD ST2000DM001 | $99.89 |
| Silverstone SDP08 3.5 to 2 X 2.5-Inch Bay Converter | $7.99 |
| Windows 8 Professional System Builder OEM DVD 64-Bit | $135.99 |
| Intel 6235AN.HMWWB Mini PCI WiFi Card | $22.00 |
| Mini PCI PCI-E Internal Antenna | $9.99 |
| Subtotal: | $1,869.39 |
| Sales Tax | $149.55 |
| Total: | $2,018.94 |
For the processor, we went with Intel’s latest (as of now) line up of Ivy Bridge desktop offerings. Since the engineer needs to, sometimes, run virtualized environments, we stepped down from the top of the line i7-3770K, lacking Intel Virtualization Technology for Directed I/O (VT-d), to the non-K version, i7-3770, that supports VT-d in all its glory, together with Intel vPro Technology, and Intel Trusted Execution Technology. We also do not plan overclocking the processor, making the non-K version a natural choice.
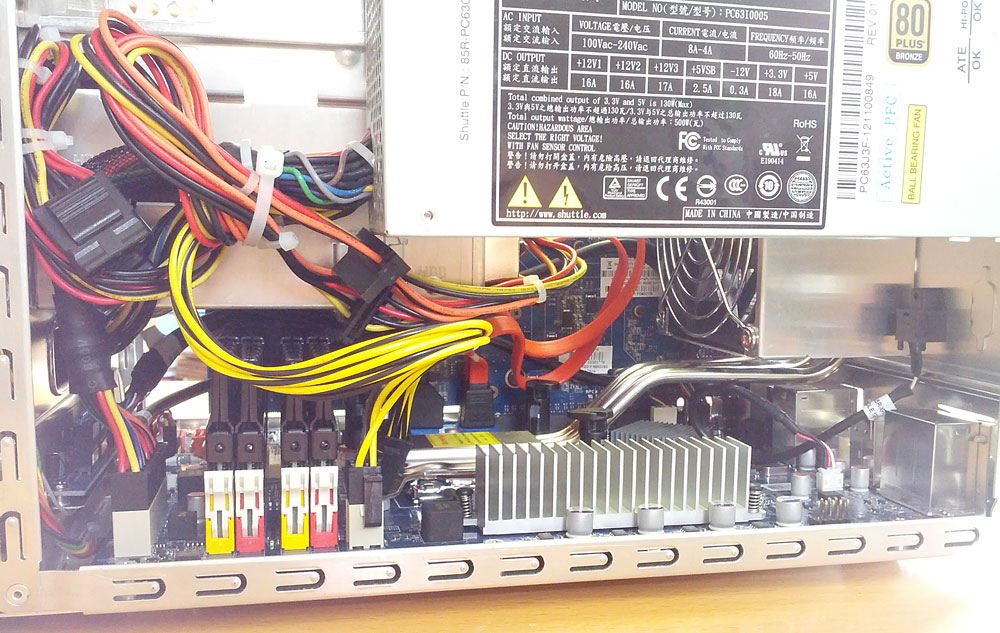
SZ77R5 xPC is Shuttle’s Socket LGA1155 proposition featuring Intel Z77 Express chipset. These barebones systems are sometimes referred to as cube; but in reality they are more cuboid, ours measuring 332(L) x 216(W) x 198(H) mm. The xPC features Shuttle’s dedicated Integrated Cooling Engine Technology (I.C.E.), with heat pipes moving the radiator to the case back panel.
I especially want to mention Shuttle’s excellent 80 Plus, bronze certified, 500W power supply. Together with enough space for a dual slot graphic card, SZ77R5 can run such GPU monsters as AMD Radeon HD 7970 or nVidia GeForce GTX 680.
nVidia GTX 680 is what we chose for our build. I swept the Internet for AutoCAD benchmarks, and GTX 680 was consistently reported on top. The recently released GTX Titan is likely to be even faster, but at over twice the price, I really doubt it can offer double in AutoCAD performance, so GTX 680 it is.
Four DDR3 modules running in dual-channel configuration at 1600 mega transfers per second (MT/s) each are going to be responsible for the computer random access memory (RAM). As far as persistent storage, for the main disk we are relying on a screaming 500GB solid state drive (SSD) with a 2TB magnetic disk used for automatic daily backups.
Putting the system together was easy. The most unusual part of the build was the Mini PCI wireless network adapter, and routing the internal antennas for it.
Mini PCI cards, and our Shuttle SZ77R5 has space for two – one full-height and one half-height, are held in their slots with M2 screws. Unfortunately, Shuttle does not include any M2 screws with their system, so you may find yourself stuck with your build until you obtain the little pesky screw; and you cannot really proceed forward, since the Mini PCI cards are located under the video card, which is in turn located under the storage rack; so you kind of have to place the Mini PCI cards in at the beginning of your build.
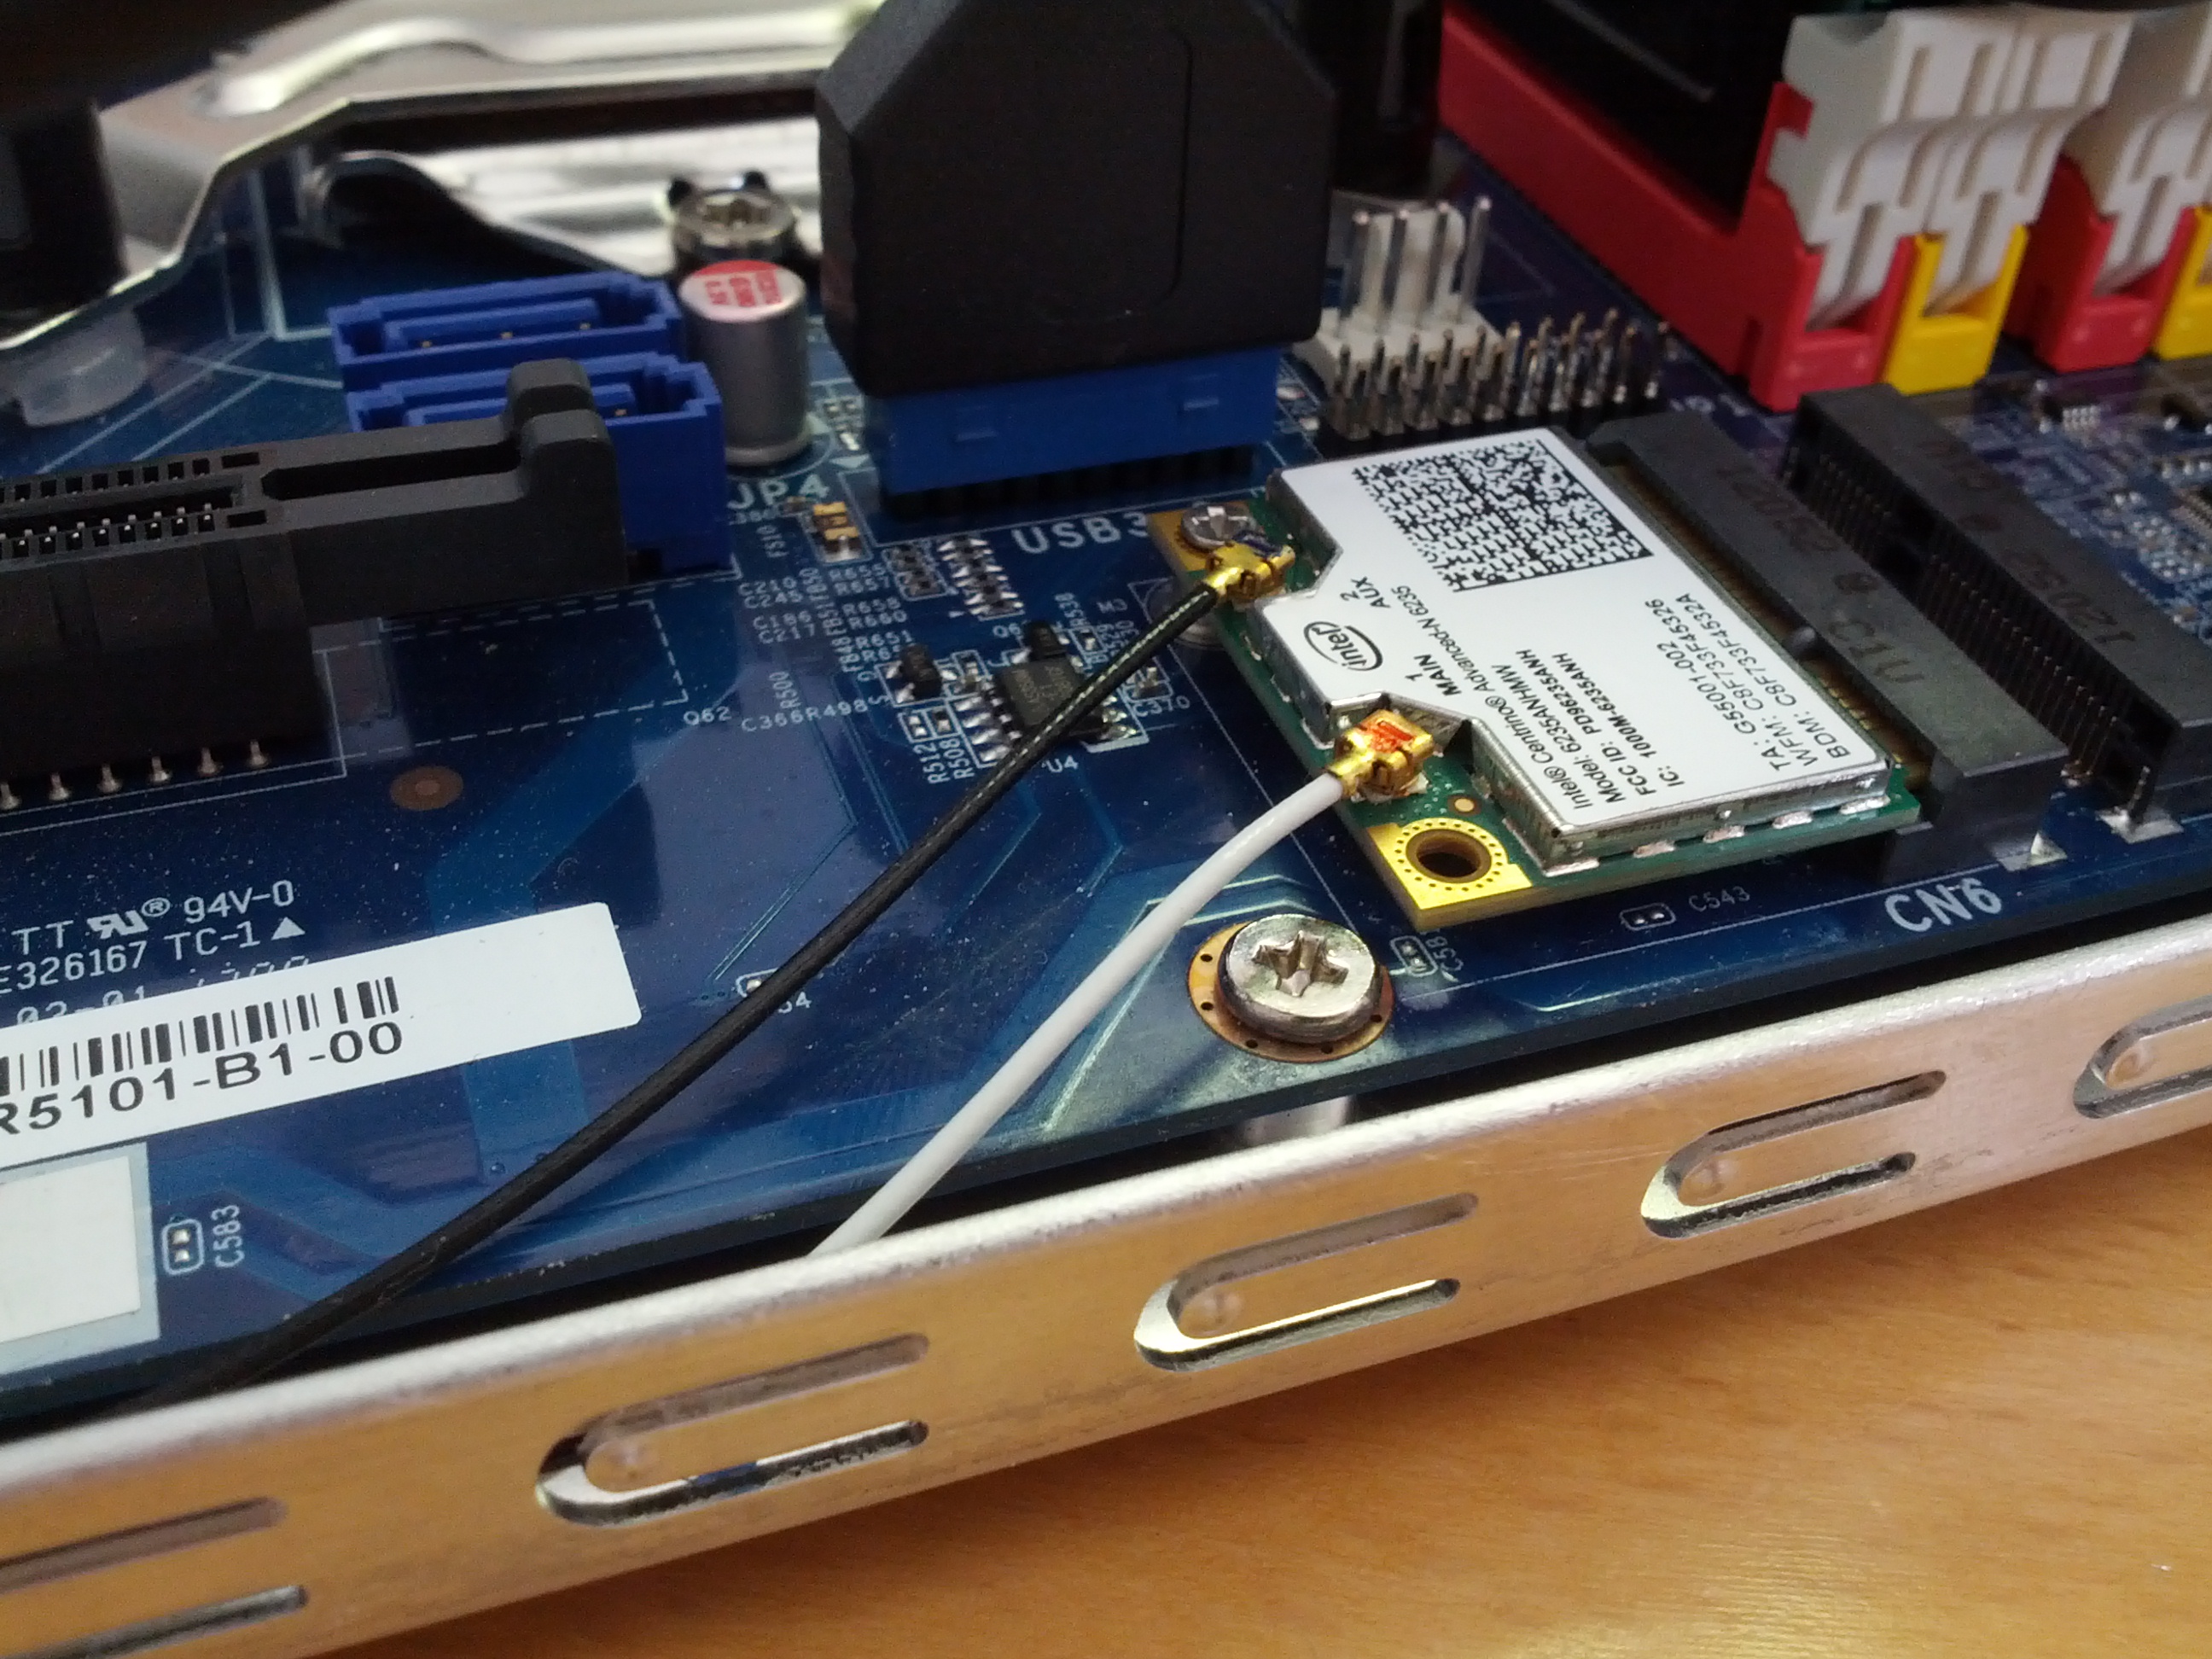
I really encourage Shuttle to start including M2 screws with their bare bone kits. Until then, make sure to get your own M2 screws, if you are placing Mini PCI cards in your system. There is plenty of relief for screws as long as 10 mm; the typical Mini PCI screws are M2 x 5 mm or M2 x 3.5 mm. You need one for a half-height card and two for a full-height Mini PCI card.
Shuttle SZ77R5 features three knock-outs for external WiFi antennas in the top area of the back panel. Since our engineer will be traveling with the system a lot, I do not want him to break the external antennas off; this is why I opted for internal antennas. The ones I chose look like little flat squares with sticky backing and thin coaxial cables going to the WiFi card.
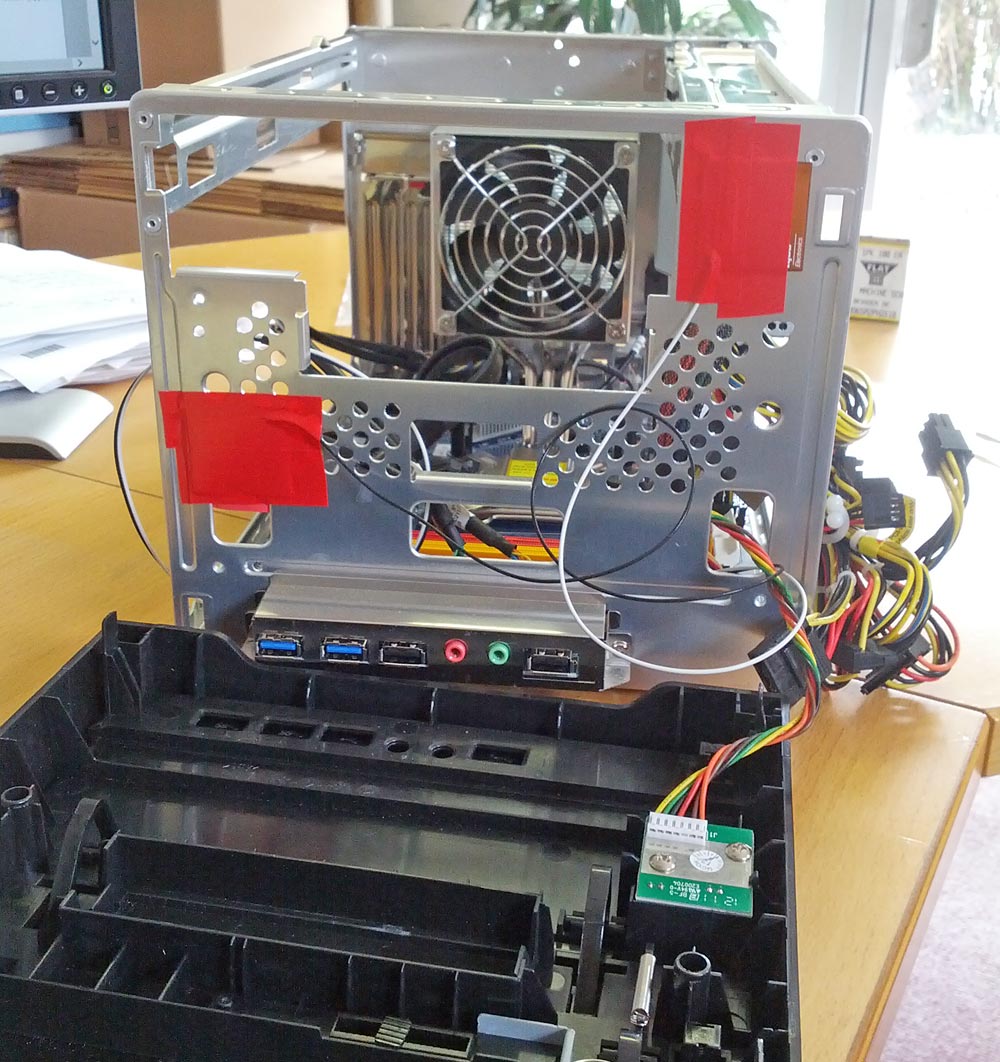
To mount the WiFi antennas, I carefully removed the Shuttle xPC plastic front face, and attached the antennas to the front of the aluminum panel. For extra security I taped the antennas over with vinyl electrical tape. The thin coaxial cables are somewhat fragile, make sure to route them carefully, avoiding pinches and sharp turns.
The rest of the build was standard and uneventful. Make sure to use zip-ties for neatness and good airflow.
This computer has space for an optical drive; but we just did not need one. To install Windows 8 Professional, I copied the installation disk to a bootable flash stick.
Installing Windows, drivers, and updates did not present any problems. Before installing Windows 8 you need to decide, if you are using Globally Unique Identifier (GUID) Partition Table (GPT) or Master Boot Record (MBR).
GPT is preferred if you want to use the new Unified Extensible Firmware Interface (UEFI) boot mode. It is also required for partitions over 2.2 TB large.
Since, at the time of writing, UEFI is not very well supported in all hardware, and we do not have disks larger than 2TB anyway, we opted for the old and trusted MBR mode.
For backup, Windows 8 includes a brand-new file backup functionality, which lacks full system restore. Fortunately, the old Windows 7 backup system is also included, and in Windows 8 it is, unsurprisingly, called “Windows 7 File Recovery.” We have set up the later to do a full backup of the system SSD disk to the 2TB magnetic disk every day.
If you, like us, configure Windows 7 File Recovery in lieu of other options, there is an extra step you need to take. Go to Services, and change the Windows Backup startup type to Automatic, and start the service; otherwise, your subsequent backups will fail, and you will even get nothing but blank screen when going to Windows 7 File Recovery.
November 12, 2013 update. Warning! Since the article was published we had to use the system image restore on this computer. At that time the most recent system image created would fail restoring with error 0x80070057. Using the process of elimination we found a good system image that would restore the PC, dating about a month prior. During that month our engineer was very active installing multiple applications on the computer, using various cloud services, and reconfiguring the machine – something made his computer incompatible with image creation; from that point on, the computer would silently create corrupted backups. As such, I no longer recommend Windows 7 File Recovery on a Windows 8 computer. Employ a third-party solution instead.
SSD manufacturers offer tools for tuning their storage devices. I used Samsung Magician software to tune our 500 GB SSD for best performance. Part of the tune-up, for example, was creating a special 47 GB over provisioning partition and updating the disk with latest firmware.
Well now, the computer is ready; let us see how well it performs.
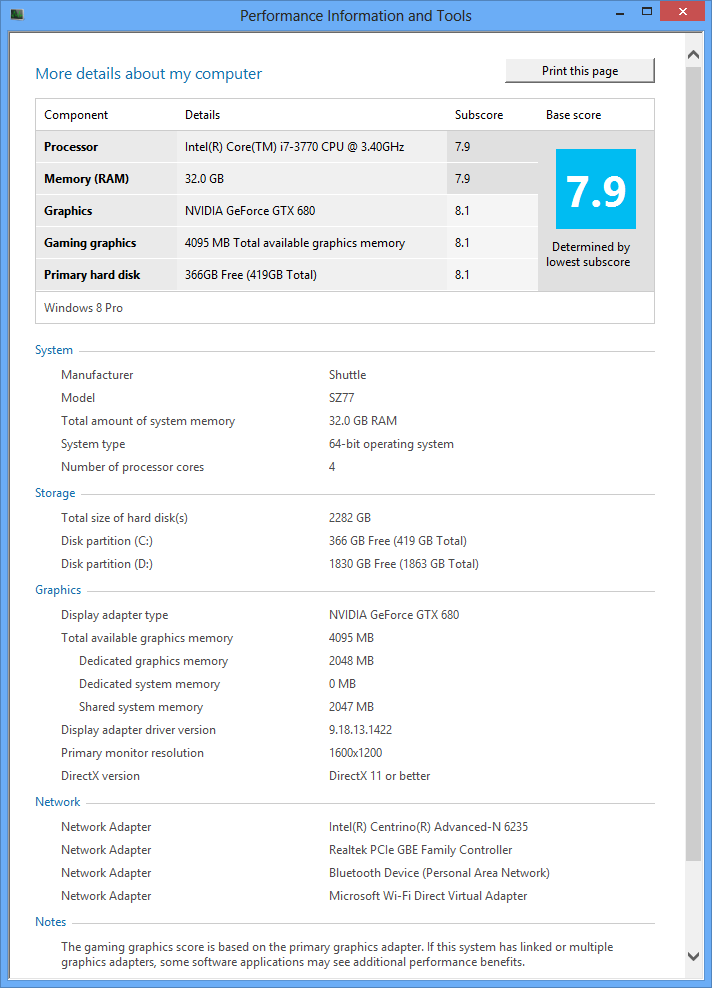
The Windows Experience Index is 7.9 for processor and memory, and 8.1 for everything else – not bad at all.
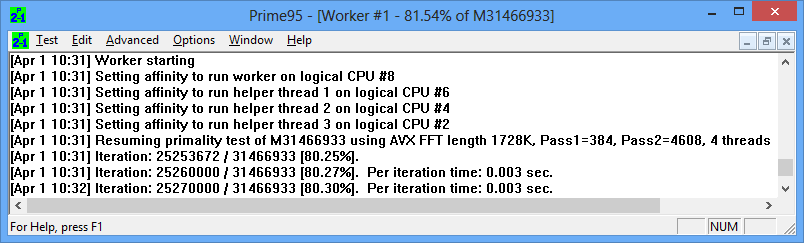
Running a Lucas–Lehmer primality test on a 31-million range exponent with Prime95 using one worker plus three helper threads for fast Fourier transform (FFT) calculations gives us the processor performance timing of 3 milliseconds per iteration. This is good, but, understandably, not as good as the Sandy Bridge-E system I built a few months earlier.

To measure graphics performance I used mfaktc application version 0.20 with barrett76_mul32_gs kernel on a 70-million range exponent, taking it from 70 to 73 bits of trial factoring. At 98% GPU load our factory-clocked GTX 680 card showed performance above 290 GHz-days per day. This is below the previous generation GTX 580 and below the latest GTX Titan, but the GTX 680 is more power efficient.
Then again the particular application performance is more important. So, seek benchmarks that mimic your usage the best.
The computer is fast, but how much electricity does it gobble? Measured at the 110 Volt AC outlet, the power consumption is in the following table.
Idle |
44 W |
CPU 100% |
107 W |
GPU 98% |
156 W |
CPU plus GPU |
225 W |
This is very good. For comparison, the older i7-920 based Shuttle xPC on my desk, equipped with a GTX 580, sucks 514 Watts out of the outlet when the CPU and GPU are under load.
Temperature wise, our new computer CPU never got above 84 degrees Celsius in our testing, and the GPU only got as hot 67 degrees. Both are well below thermal limits, and since we are not overclocking we are not concerned here at all. At moderate load, CPU temperature hoovers below 70 degrees Celsius with fans on smart control and fairly quiet.
In conclusion I want to say that I am very happy with this build, and our engineer is simply ecstatic. The computer is very powerful, very small, and everybody here loves it.