
pfSense with Snort for Small Office
By Sergey Nosov
May 29, 2014
Dedicated to Ryan Scott Lum.
When a need arose to put an integrated network perimeter device—router plus intrusion detection system (IDS) / intrusion protection system (IPS)—at a small office, pfSense software by Electric Sheep Fencing LLC piqued my interest.
pfSense is a, FreeBSD operating system based, open source, stateful packet filtering firewall, router, load balancer, virtual private network (VPN) Appliance, Dynamic Host Configuration Protocol (DHCP), Network Time Protocol (NTP), Point-to-Point Protocol over Ethernet (PPPoE), and Captive Portal server with Universal Plug and Play (UPnP), NAT Port Mapping Protocol (NAT-PMP), Internet Group Management Protocol (IGMP) Proxy, Wake on LAN (WOL), Simple Network Management Protocol (SNMP), and Virtual Local Area Network (VLAN) support.
What makes pfSense especially powerful is a multitude of packages that provide additional functionality. The rich list of packages includes Snort and Suricata IDS/IPS, Squid high performance web proxy cache, FreeRADIUS authentication service, and many other packages for serving, filtering, tunneling, logging, and other networking needs.
There are some notable omissions, which may or may not be important to you. For instance, the current version of pfSense, as of the time of this article writing, does not support IEEE 802.1X port-based authentication of wired clients. As such, if you need network level access control you may have to implement it separately (with a network access control (NAC)/802.1X compatible downstream switch, for example).
Wireless radio support is also somewhat limited in pfSense, but this inadequacy is easy to overcome with a separate Wireless Access Point (WAP) device. As a case in point, I purchased a TP-Link TL-WDR3500 router for $39.99 new, excellent value for a device with both 2.4 GHz and 5 GHz radios. I flashed the router with OpenWRT Linux distribution for embedded devices (voids warranty), which allowed me to bridge multiple VLANs, that I trunk from the pfSense with a single cable, each to its own wireless service set identifier (SSID).
The router even had enough space left to also make it a Common UNIX Printing System (CUPS) server, for giving access to our guest wireless users to a printer via Universal Serial Bus (USB) port. Tip: if you are using an HP printer, disable the "Smart Install" feature, to make the printer compatible with CUPS on USB connection.
Talking about hardware that attaches to the pfSense, brings us to the discussion of hardware needed to run the pfSense itself. Being very resourceful pfSense can run on multitude of devices, starting with very small and power efficient fanless security appliances and going up to powerful servers for installations where very high throughput is needed.
For small devices with compact flash (CF) or disk on module (DOM) based storage, pfSense supports the special embedded kernel installation based on NanoBSD operating system image. This type of installation keeps most write operations to the system random-access memory (RAM), mounting the persistent storage partition only for brief periods of time, to minimize the flash storage wearing.
The embedded kernel install is also recommended as an easy recipe to prolong lifetime of storage for systems that use solid state drives (SSDs). Embedded install should not be used with pfSense packages that require extensive writing, such as Squid with cache. For our build I will use the full pfSense installation, also known as, symmetric multiprocessing kernel.
If you are not constrained by the box size, take a look at the Lenovo TS140 servers. They were introduced at insane street price points starting below $300, but the prices crept up as more people discovered the bargains. If you were to piece the system together yourself from new components, it would be very hard to beat these Lenovo boxes.
Lenovo TS140 are not very popular among pfSense aficionados, most likely due to only a single network interface controller (NIC) on board, and of a kind that is not yet supported by pfSense–to beat. The Intel NIC i217 should become operational in the future, once pfSense moves off the FreeBSD 8.x kernel. Until then I disable it in the BIOS setup utility, along with onboard sound card and serial port, so that they do not confuse the operating system needlessly.
What makes the Lenovo TS140 an interesting choice for pfSense is the recent appearance of Intel i350-T4 controllers, shipped directly from China, on eBay and similar sites, at prices three times plus less expensive than US retail.
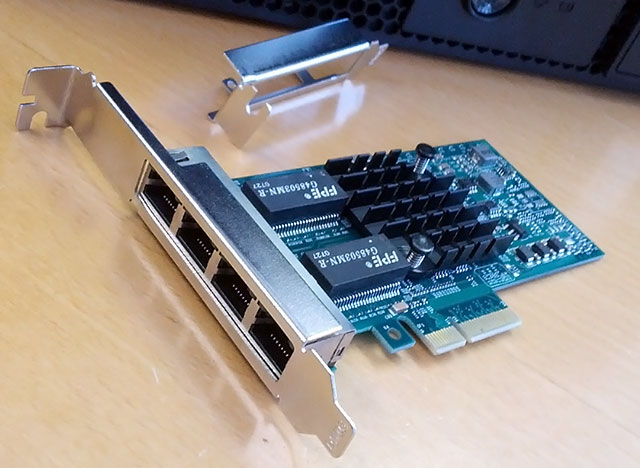
Intel i350-T4 is a quad port, server grade, PCIe v2.1, 10/100/1000Base-T Ethernet adapter with very good pfSense compatibility. Lenovo TS140 should easily support two such adapters for the total of eight ports; though I only tried one, as four ports are plenty for my needs.
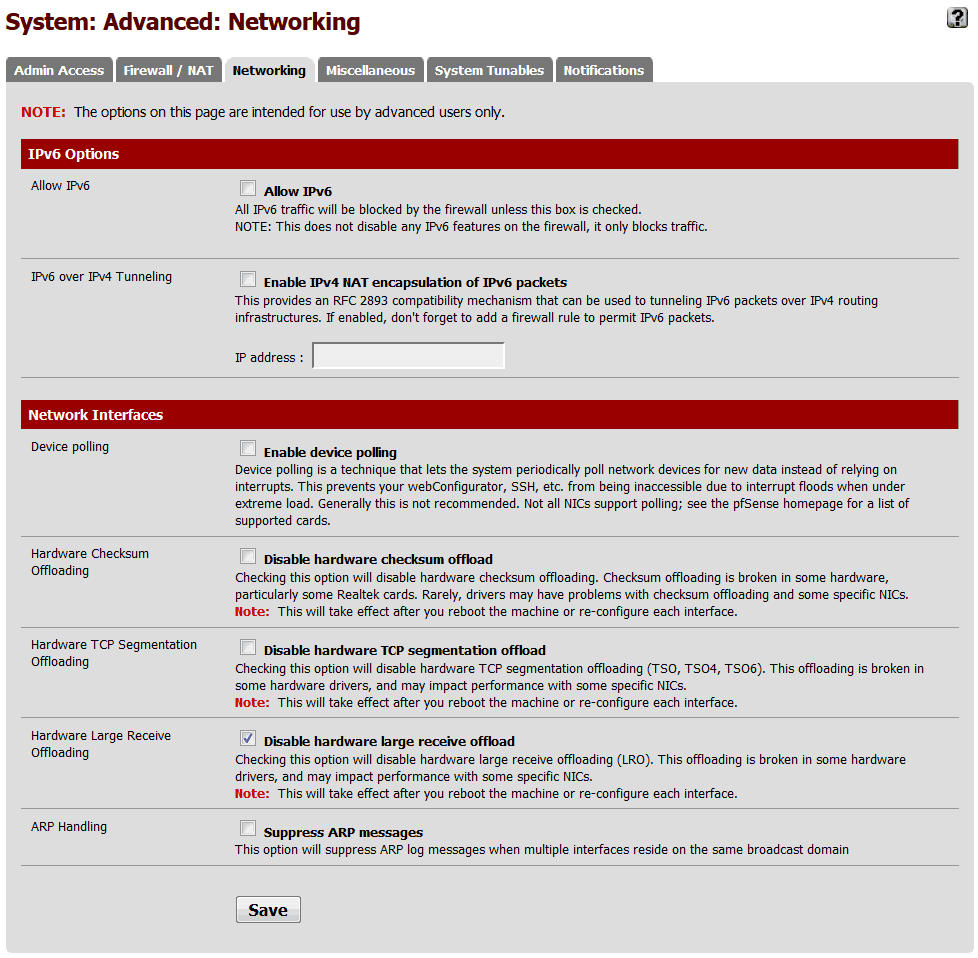
The current pfSense that I am using, version 2.1.3-RELEASE (amd64), did not behave well (causing massive slowdown of network traffic) when I tried to uncheck the “Disable hardware large receive offload” option on the “Networking” tab of the management interface “System: Advanced” screen. So, while the rest of Network Interface restriction options can be unchecked, you may want leave the “Disable hardware large receive offload” as is, until this issue is addressed.
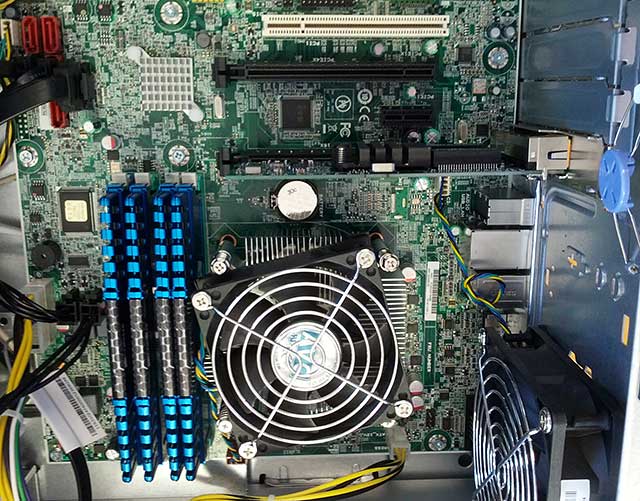
The particular Lenovo TS140 barebones that I purchased for the pfSense build, model number 70A4-000HUX, comes equipped with Intel Core i3-4130 Processor. This processor hits the sweet spot of price vs performance; it belongs to the original Haswell line of Intel processors. If Lenovo switches to Haswell refresh line, revealed by Intel in May of 2014, you should be able to get a processor 100 MHz faster for the same money; but there is always something better in the future.
Lenovo TS140 is also available with Intel Xeon E3-1225 v3 processor that offers twice as many cores and more cache, in comparison to the i3, though slightly lower per core frequency. The Xeon versions are more expensive, and unless you have a specific reason to want the additional cores, for pfSense the cheaper i3 is not bad at all.
Curiously, the Intel i3-4130 supports Error Checking and Correction (ECC) memory. And while ECC memory is very important for something like a network-attached storage (NAS) server running ZFS file system, I will not preach to run ECC RAM on a pfSense box, where each passing frame is check summed anyway. Furthermore, both the ingress and egress buffers on the Intel i350-T4 adapters, that we employ, do use ECC memory.
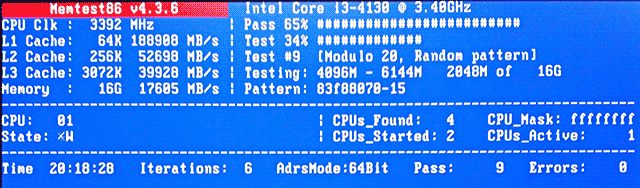
While ECC memory is slightly more dependable overall, in my opinion it is even more important that the memory comes from a reliable manufacturer. I have seen both non-ECC and ECC memory fail. For this build I am using a 4 x 4 GB DDR3 kit that I had lying on the shelf. I let Memtest86 run for ten passes without errors, before proceeding further.
As the base pfSense has very modest memory requirements, how much memory you need in your system depends on the packages you want to run. You can start with whatever amount of memory you server comes with, and then expand as needed. Remember, since these processors use dual-channel memory controllers, for the best performance install memory modules in identical pairs. In Lenovo TS140, you can install up to 32 GB of DDR3-1333/1600 memory (4 x 8 GB).
Generous memory allows such luxuries as switching Snort to the fastest available search method (AC: high memory, best performance), running Snort on multiple interfaces, and better performing Squid cache. You can also experiment with memory file system or RAM disks (these settings are available at the bottom of the “Miscellaneous” tab in “System: Advanced” configuration options), which make the full pfSense installation behave a lot like the embedded kernel we discussed earlier.
The next piece of hardware puzzle we need to decide on is storage. Since we are building a device that will be controlling the network in the small office, I prefer this system to have self-contained storage, rather than rely on network boot. Then our choice narrows down to solid state drive (SSD) vs traditional spinning hard disk drive (HDD).
SSD technology comes with very attractive advantages over tried-and-true magnetic hard drives. SSDs run cooler, consume less electricity, on the macro scale contain no moving parts, resistant to vibrations, silent, and provide insanely faster random access performance.
On the other hand, SSD technology is still new. What will we know five years from now about SSDs released in 2013/2014? Perhaps we will learn that these SSDs blow traditional HDDs out of the water in every sense of the way; or maybe, on the contrary, a fatal flaw will be discovered. Who knows?
Furthermore, by now you have probably already guessed that this build is somewhat on the budget side. If I told you to buy a write-optimized, enterprise grade SSD, that drive alone would cost more than the rest of the system combined. If you step down to cheaper SSDs I urge you to, unless your system will be connected to a reliable uninterruptible power supply (UPS) with regularly maintained batteries (and even then the power supply in the computer itself can still fail), at least get one with Power Loss Data Protection.
Computer losing power while the drive is saving information can lead to corruption. Where with traditional HDDs you get a corrupted file, with SSDs, due to current wear leveling algorithms, a loss of power during write can wreak havoc on the complete file system.
For our build I opted for a couple of Seagate Barracuda 500 GB 7200 RPM hard drives (model number ST500DM002) that I will be placing into a RAID1 mirrored array, so that when one hard drive fails the system can continue operating from another. At just over $50 a pop, price-wise, two of these hard drives will beat all but the cheapest SSD drives while offering more space. Lenovo TS140 comes with rails for two 3.5” drives but with only one serial advanced technology attachment (SATA) cable, if you do not have a spare cable, you will need to obtain one with a straight connector on one end and a 90-degree connector on the other.
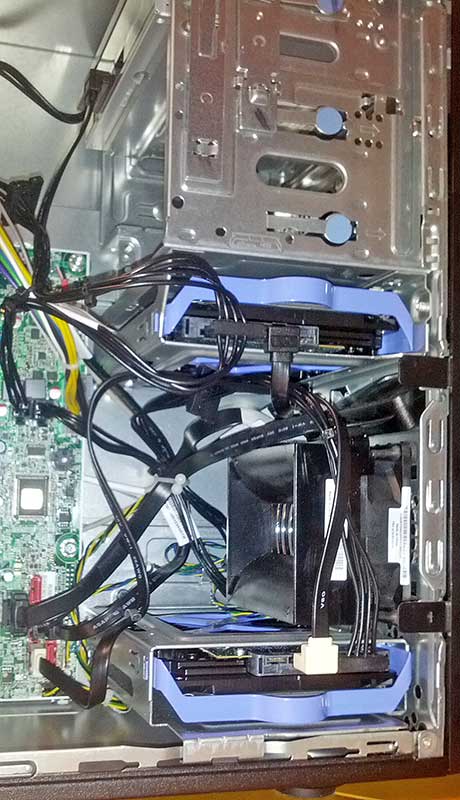
The server platform I am using for this build offers Intel Rapid Storage Technology also known as Matrix Storage Manager, a popular firmware redundant array of independent disks (RAID) system. Firmware RAID systems are commonly referred to as “fake RAID” in contrast to “true RAID” systems that provide RAID functionality independent from computer operating systems. “Fake RAID” support in the pfSense underlying operating system FreeBSD is historically flaky, that is why, instead, I will be using the software RAID provided by the operating system’s geom_mirror storage module. Software RAIDs, such as the one I will be using, are independent of hardware or firmware and run on any disks the operating system can see.
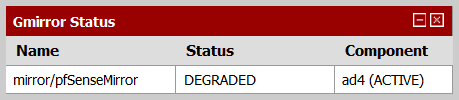
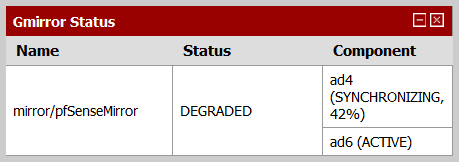
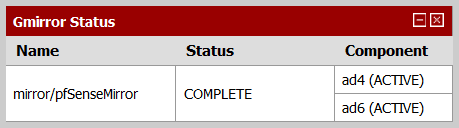
pfSense has very good support for geom_mirror. You can configure a new mirror during pfSense installation (choose “Custom Install”), and once running you can see the status of the array through a special “Gmirror Status” widget in the pfSense Dashboard (click on the plus sign in the Dashboard top-left corner to see the list of all available widgets).
Below are screenshots of the widget in three array states: degraded, synchronizing, and complete.
Do not forget to add both drives to the server boot priority lists in the BIOS setup utility (hit F1 while the computer is booting to access the BIOS setup), so that when one drive fails the system can boot from another.
Awesome, our pfSense box is ready to rock. You can configure interfaces, change all kinds of configuration options, and install the packages you want by going to the “Available Packages” tab of the “System: Packages” management interface page. I installed the “snort” security package, and enabled it with Snort VRT Rules automatic “Security” IPS Policy Selection.
One of the first things I wanted to do is to check how much delay the pfSense device introduces. For that I setup two computers, both running the iperf network testing tool (one computer is server mode, another—connecting to the first computer as a client). I then measured the connection speed between the two computers, first connected directly to each other with network cable, and then with the pfSense box between them, traversing wide area network (WAN) to local area network (LAN) interfaces with Snort enabled and disabled. I repeated each measurement eight times, and got the following data.
| iperf - Mbits/sec - Window size: 64 KB | |||
| Measurement | pfSense | Straight Cable | |
| Snort | No Snort | ||
| 1 | 587 | 566 | 650 |
| 2 | 577 | 567 | 649 |
| 3 | 522 | 565 | 653 |
| 4 | 581 | 514 | 651 |
| 5 | 584 | 564 | 655 |
| 6 | 521 | 567 | 650 |
| 7 | 584 | 565 | 653 |
| 8 | 586 | 565 | 654 |
| Geomean | 567 | 559 | 652 |
The bottom row contains geometric mean values of the corresponding eight measurements above it.
Do not pay too much attention to the low absolute values; these are due to the small window size used during measurements (64 KB, default for this version of iperf). More interesting are the differences that we got. As you can see our pfSense build slows the network down by less than 15%; I can live with that. Now, the true test will be when the device is taxed by multiple clients accessing different kinds of content; the assessment we just did is very basic.
Another interesting thing you may have noticed is that according to the test results our pfSense device performed better with Snort enabled than it did with Snort disabled. To understand why this happens, let us first review how Snort functions within pfSense.
Intrusion detection/protection systems have two basic forms of operation: inline and passive. In the first mode, IDS/IPS captures the incoming traffic, inspects it, and then makes a decision on whether to reproduce it on the outgoing interface or drop it. As you can imagine this mode of operation must introduce some delay.
In the passive mode of operation, IDS/IPS never ‘owns’ the traffic. It receives copies of all the network packets on the interface, to examine at its leisure, but does not directly impede the flow of data. The passive mode, also called promiscuous mode, is how Snort package operates on pfSense.
Even as an intrusion protection system (with the “Block Offenders” option on), Snort on pfSense does not drop packets by itself, but rather reprograms the pfSense firewall module to block the offending traffic. This reactive method of operation is worth keeping in mind for the times when you start wondering why some malicious packets make it through to your network before the attack is blocked.
Anyway, this explains why the test with Snort was not slower, but why was it a little faster? A possible reason lies within multitude of power saving features modern computer systems have. By placing load on the system Snort could have kept it from going into power saving states so much, with higher performance overall. If you prefer to have the highest possible performance available on demand in lieu of lower amount of electricity consumed, feel free to go into the system BIOS settings and disable every power saving feature and processor state you can find. Some power saving options can be configured with custom /boot/loader.conf file settings.
Personally, I will leave the power saving options on, as after plugging the system into the live infrastructure I am observing good performance.
Overall I am happy with this pfSense build. I am sure the device will serve for many years. I recommend the Lenovo TS140 platform as a base for an integrated network perimeter device with two caveats. First, you must be ok with the computer size (the TS140 is a minitower at 7”W x 15”H x 18”D). And, second, you should have a clear plan as to what network interface adapters you will be using.
Good luck!
www.orderfactory.com is a participant in the Amazon Services LLC Associates Program, an affiliate advertising program designed to provide a means for sites to earn advertising fees by advertising and linking to amazon.com.