Renewing TLS/SSL Server Certificates
By Sergey Nosov
August 30, 2013
Transport Layer Security or Secure Sockets Layer (TLS/SSL) certificates are small data files that contain authentication information for confirming that data is being served from a domain that the server claims belonging to. The key in the certificate is then used to start the process of connection encryption between the server and the client, to prevent third party eavesdropping while in transit.
TLS/SSL is the technology choice behind Hypertext Transfer Protocol Secure (HTTPS) web sites, as well as the whole array of other types of information exchanges that require privacy, including secured email, secured remote access, virtual private network (VPN) security, and others.
In the book “Configuring Windows 2008 R2 Web Server” we talk about types of TLS/SSL certificates and installing a new certificate on your server. Here, let us talk about renewing certificates.
Whether you are using certificates you created yourself or ones issued by a commonly trusted certification authority (CA), each certificate has specific Valid from and Valid to dates and times. Normally, you should renew certificates before expiration date; expired certificates cause communications to fail or trigger warnings to users.
To manage the certificates we will be using the “Server Certificates” feature of the Internet Information Services (IIS) Manager, though for some operations (such as changing certificate friendly names), under Windows 2008 R2, we do need access to the Certificate Manager Management Console Snap-in. We will show you how to do the latter at the end of this article.
Open IIS Manager (click the “Start” button, then choose “Administrative Tools – Internet Information Services (IIS) Manager”) and click on your server home node, just under the Start Page, but above Application Pools, in the connections pane on the left.
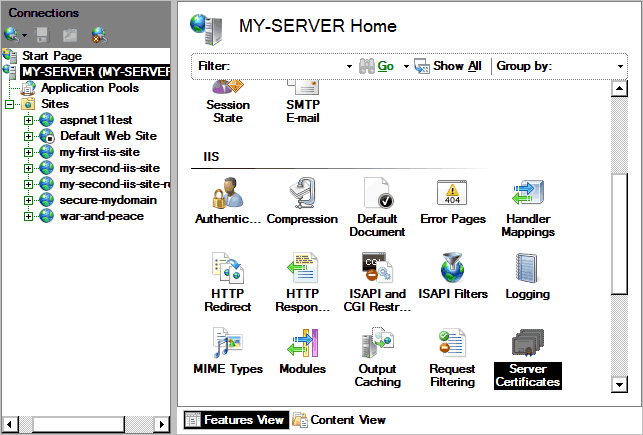
In the features view in the middle, scroll down and double click on the “Server Certificates” feature within the “IIS” group of features.
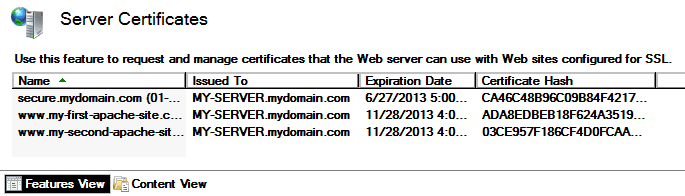
This is where you will see the list of TLS/SSL certificates currently installed on your computer. You can request and install new certificates through this screen, but right now we are interested in renewing.
Please note: renewing a certificate creates a certificate renewal request based on the certificate being renewed. If the information contained in the certificate is incorrect, or if you want to change certificate properties such as the cryptographic key length, then you need to create a brand new certificate request, rather than the renewal request.
Right-click on the certificate you are interested in renewing and select “Renew...” from the pop-up menu, or select the certificate and click on the “Renew…” action in the Actions pane. If the renewal option is not available, you can always generate a brand new certificate request instead.
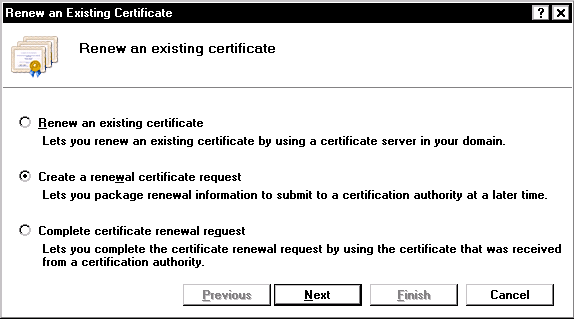
If you created the original certificate request by sending a certificate request file to the certification authority or pasting contents of the certificate request file to an on-line form, then chances are you need to do the same now, so choose the “Create a renewal certificate request” option, and click the “Next” button. You will be presented with a dialog to specify a file name where the certificate request information will be stored.
After specifying the file name and clicking the “Finish” button, you can take the newly created certificate request file to the certification authority and purchase or otherwise obtain the renewal certificate.
Some certification authorities have problems accepting certificate renewal requests as is. If you run into this problem, you can try modifying your certificate request using the certutil command line tool, as follows.
Open the command prompt, change the current directory to the directory that contains the certificate renewal request file you just generated and, run the following command:
certutil -split renew-req.txt
Where renew-req.txt is the name of the certificate request file generated in the previous steps. The command you just run should create several new files, one of which is Blob0_1.p10. Next, run the following command:
certutil -encode Blob0_1.p10 renew-req-mod.txt
Where renew-req-mod.txt is the name of the new, modified certificate request file. Now, you can try submitting the renew-req-mod.txt file (or its contents) to the certificate issuing authority that had problems accepting the unmodified certificate renewal request.
Once the renewed certificate is ready, the certification authority gets it to you in the form of a “.cer” file (or a file that you can extract or covert to the Base-64 encoded X.509 “.cer” format). Go back to the “Renew an Existing Certificate” window for the certificate being renewed, and this time choose the “Complete certificate renewal request” option.
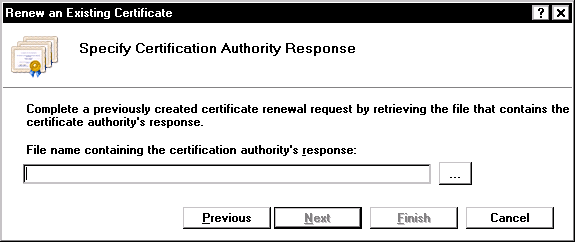
On the “Specify Certification Authority Response” screen select the “.cer” file you received from the Certification Authority, and click the “Finish” button.
At this point, even after the certificate was successfully imported, you may receive the following error: “Cannot find the certificate request associated with this certificate file. A certificate request must be completed on the computer where it was created.” Dismiss the error and refresh the list of the computer certificates (by pressing the F5 keyboard key); if you can see the renewed certificate on the list you can ignore the error.
Having multiple TLS/SSL certificates installed on your server, when you get to assigning the certificates to secured web sites, or other network services, Windows lets you select a specific certificate by its friendly name. Sometimes you end up with certificates with empty friendly names, or with multiple certificates sharing the same friendly name. To avoid confusion, use descriptive friendly names; you may also want to add the certificate expiration date to the friendly name, so that to make it easier to distinguish between old and new certificates.
As we mentioned at the beginning of this article, changing certificate friendly names is accomplished through the Certificate Manager Management Console Snap-in. If we launch the snap-in directly, Windows will take us straight to User certificates. In this case we need access to Computer certificates; that is why we will be launching the Certificate Manager through the main Microsoft Management Console instead.
Click the “Start” button, type “mmc.exe,” and hit Enter to launch the Microsoft Management Console.
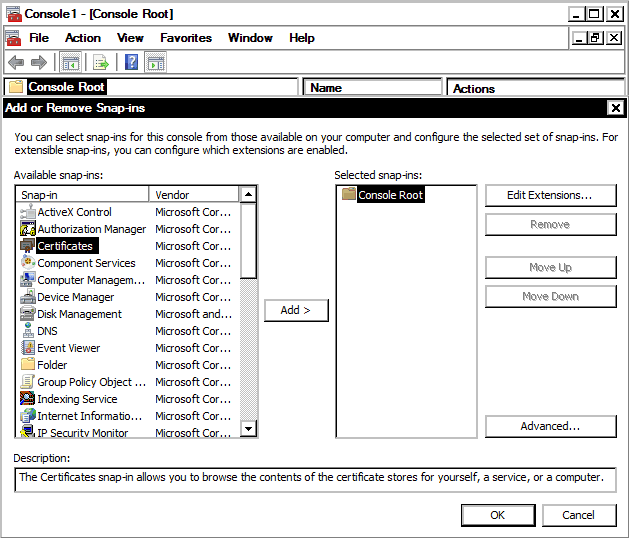
From the “File” menu select “Add/Remove Snap-in…” menu item. On the Add or Remove Snap-ins dialog select Certificates from the list of available snap-ins and click the “Add >” button. A window will pop up with three options:
- My user account
- Service account
- Computer account
Select “Computer account”, and click the “Next” button. On the next screen, keep the default “Local computer: (the computer this console is running on)” option and click the “Finish” button. Then click the “OK” button to close the “Add or Remove Snap-ins” screen.
On the left-side tree of the Microsoft Management Console window, expand the "Certificates (Local Computer)” node, and drill down to “Personal,” then “Certificates."
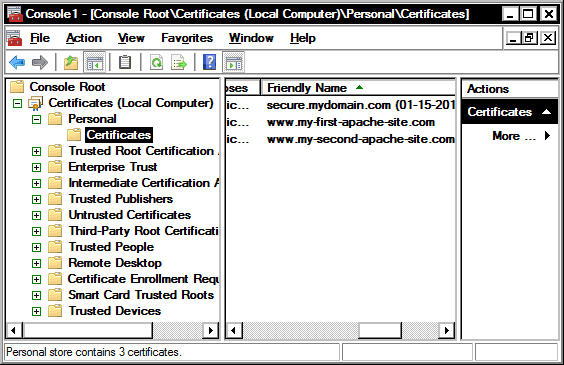
In the middle pane of the Microsoft Management Console you should now see the list of the same certificates available through the “Server Certificates” feature of the Internet Information Services (IIS) Manager.
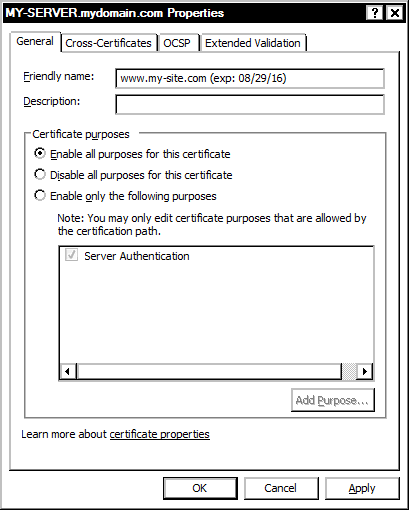
To change the friendly name, right click on a certificate, select “Properties” from the pop-up menu, and edit text in the “Friendly name” edit box, before clicking the “OK” button to save the changes.
Last but not least, you may want to go through all of your secured web site bindings and other network applications and services that use certificates to make sure that the correct certificates are selected.
We hope this article made it a little easier for you to renew and manage TLS/SSL certificates on your Windows server.